

[ad_1]
Learn how to repair overexposed pictures in Lightroom is an important talent each photographer ought to grasp as a result of it’s unimaginable to get the right publicity with each shot.
It’s a easy and easy course of that requires you to grasp how publicity adjustment instruments work in Lightroom.
To repair overexposed pictures in Lightroom, you at all times begin with the Spotlight slider transferring it to the left. Subsequent, you observe with the White adjustment, slowly dragging it to unfavorable values. Within the final step, you utilize the Publicity slider to carry the general publicity to the specified stage.
Understanding Publicity and Overexposer
Publicity is among the most elementary ideas in pictures. It’s also an idea that we be taught on the very starting of our pictures journey.
Publicity in pictures determines the quantity of sunshine that you just, as a photographer, allow to achieve the digicam’s sensor. Publicity defines how vibrant or how darkish your images are.
If you take pictures, you—together with the assistance of the aperture, shutter pace, and ISO—have full management over how a lot gentle you permit the digicam to file. You possibly can seize the identical scene in a different way, which implies the brightness of the pictures will differ.
When your picture is just too darkish, we name this “underexposed.” When the picture’s brightness is spot on, we name this “correctly uncovered.” When the picture is just too vibrant, we name this “overexposed.”
At the moment, we’ll discover ways to repair, or a minimum of try to repair, overexposed photos in Lightroom.
Why will we get overexposed pictures?
The digicam meter does a reasonably good job of evaluating the fitting publicity in evenly lit scenes. However as a rule, the topic we intend to {photograph} has uneven lighting. As a rule, the scenes with essentially the most complicated gentle produce essentially the most fascinating and dramatic pictures.
For instance, when taking pictures sunrises or sunsets, we are able to have massive darkish areas within the shadows and very vibrant areas within the sky. In these conditions, the digicam meter will get fooled and, consequently, units the fallacious publicity.
Overexposed pictures happen when the publicity meter assumes that the scene is darker than it truly is; it boosts the publicity and makes the picture too vibrant.
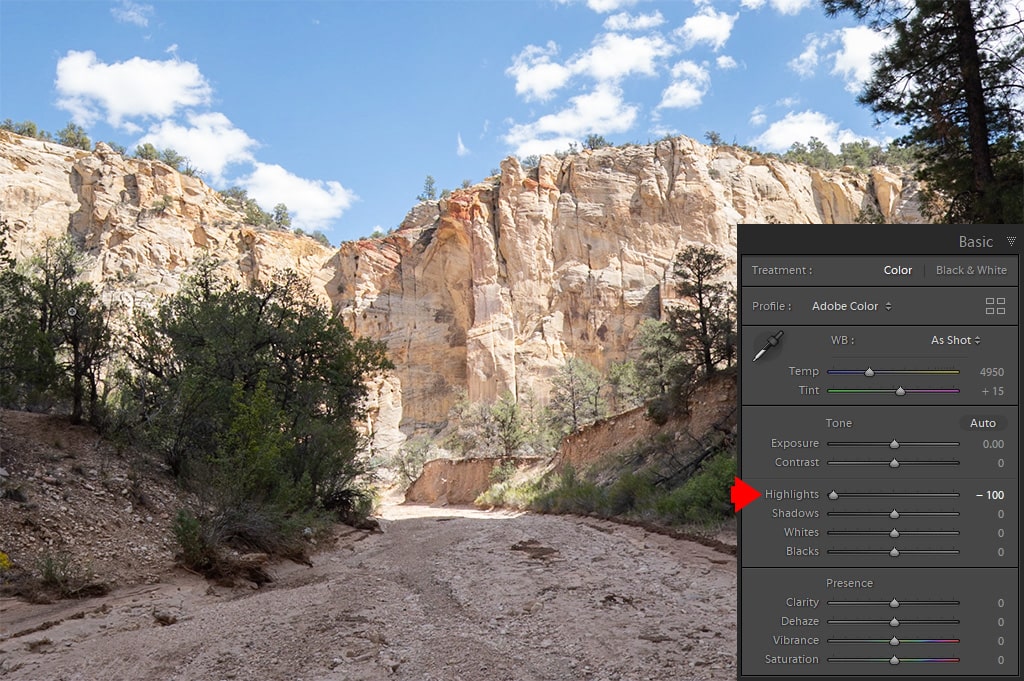
For instance, right here is a photograph I took in Utah whereas climbing on the backside of a canyon. The scene is extraordinarily contrasted with the darkish areas on the backside of the canyon and the small, vibrant space of the sky on the high.
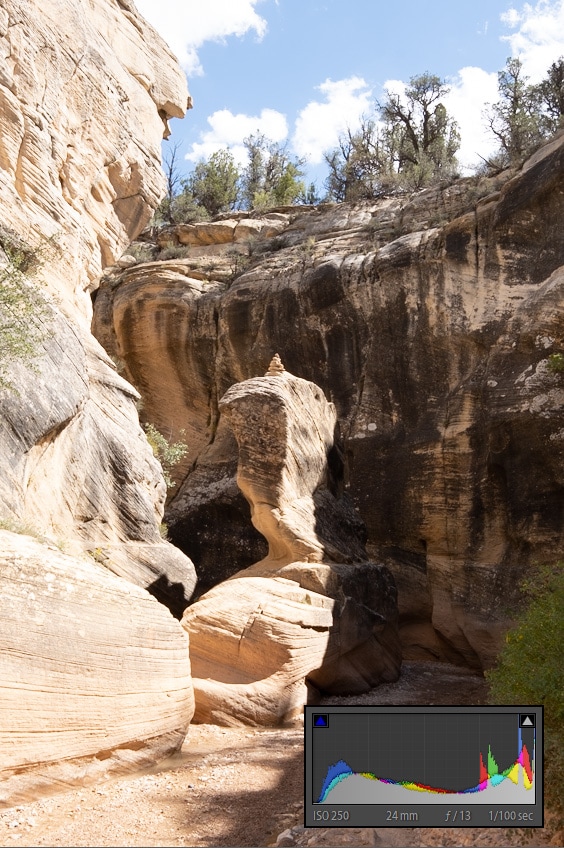
The darker space, which represents 80% of the body, fooled the publicity meter by making it imagine that the scene is just too darkish and, consequently, elevated the publicity. By doing this, it blew the world of the sky and made the picture overexposed.
See additionally: Learn how to Easy Pores and skin in Lightroom
Overexposed pictures occur to all of us. We should discover ways to repair them in post-processing.
Learn how to Repair Overexposed Photographs in Lightroom
If you import pictures to Lightroom and see that among the pictures are too vibrant or overexposed, one of the simplest ways to judge the overexposed areas of the picture is by utilizing the Histogram.
Soar to the Develop Module and open the Histogram panel from the highest proper nook if it doesn’t open by default.
Subsequent, hit the “J” keyboard shortcut to activate the Clipping Indicators.
The Clipping Indicators present the areas of the picture which can be too vibrant (highlighted in crimson) and the areas which can be too darkish (highlighted in blue).
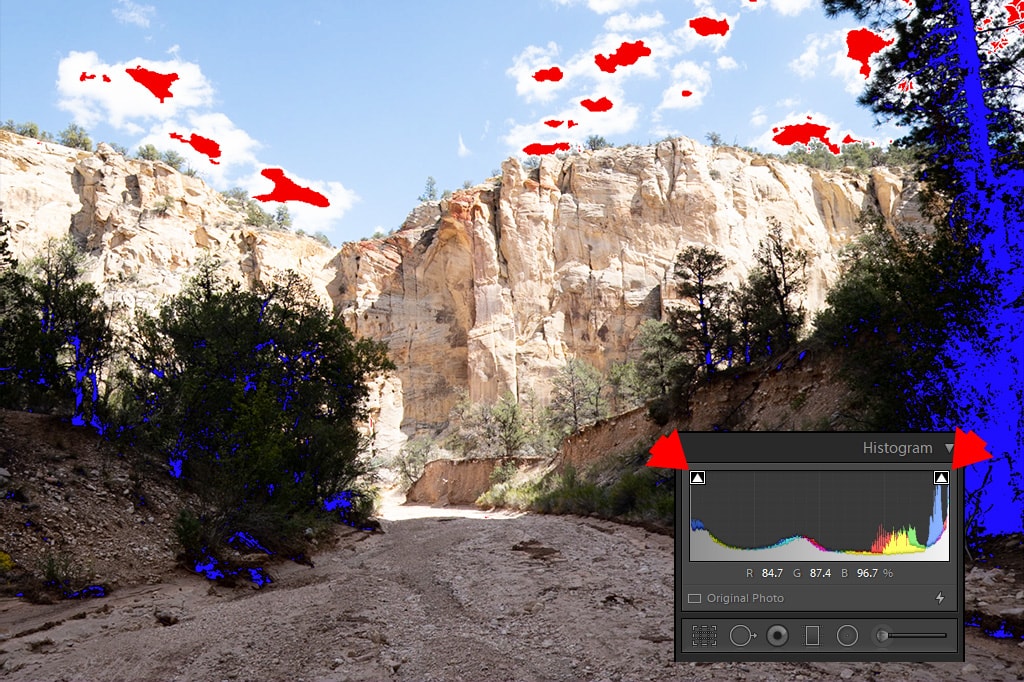
Since our aim is to discover ways to cope with overexposed pictures, we’ll solely consider the crimson highlights.
The crimson highlights establish the areas of the picture which can be blown out. Which means the highlighted areas are pure white and would not have any info in them; consequently, they can’t be recovered.
However that is solely true for JPEG photos as a result of the Lightroom Histogram is predicated on JPEG photos and never RAW info. Even for those who shoot RAW, Lightroom converts the picture to JPEG after which builds the Histogram primarily based on the JPEG model of the picture.
Which means for those who shoot in JPEG and see blown-out areas of your picture, you’re out of luck and the picture can’t be salvaged.
Associated: How To Edit Your Photographs Look Like Movie
In case you shoot in RAW, which I at all times advocate, you continue to have an opportunity to recuperate the picture.
For the reason that Histogram will not be an correct illustration of the RAW picture, you gained’t have the ability to assess the potential of restoration by trying on the picture and its histogram. It’s essential to begin by transferring the sliders to see if restoration is feasible.
Step 1 -Recuperate Highlights
I at all times begin the method of recovering overexposed photos with the Highlights Slider. I drag the slider all the best way to the left till it reaches a worth of -100.
The Highlights Slider impacts the intense areas of the picture with out affecting the pure whites, mid-tones, and shadows.
The rationale the Highlights Slider is the best software for recovering blown pictures is that it has a particular restoration algorithm. If, for instance, one of many three coloration channels (crimson, inexperienced, and blue) has no info as a result of overexposure, this system will try to rebuild it primarily based on the opposite two channels. In essence, it creates one thing out of nothing.
Subsequent, I consider if the Highlights changes absolutely recovered the overexposed areas.
If it didn’t, I transfer to the following restoration choice.
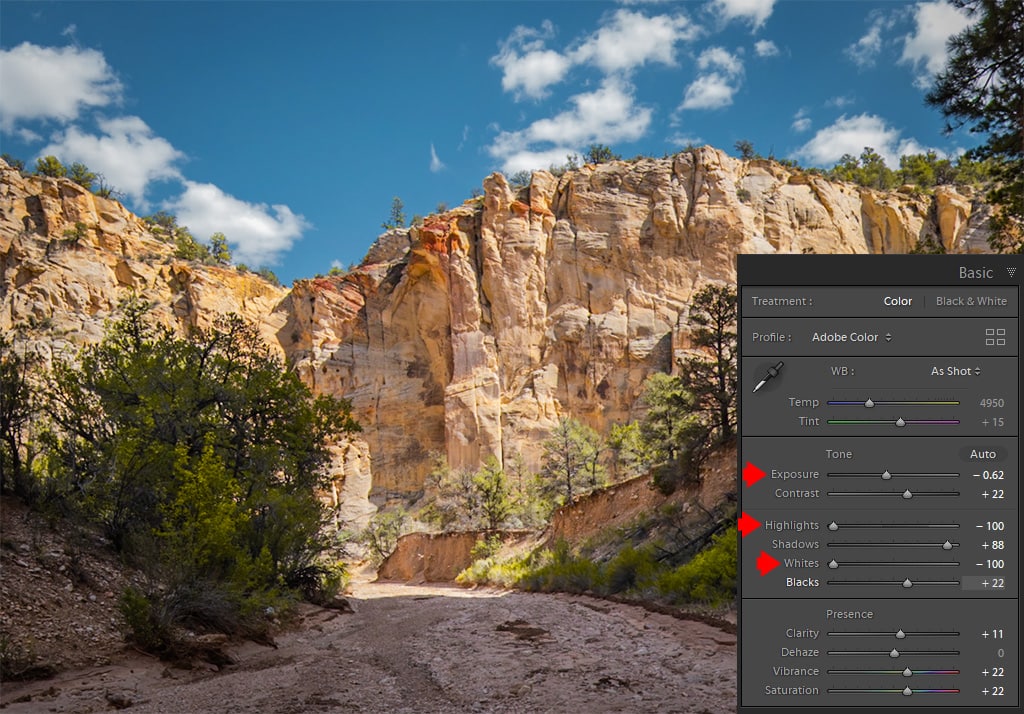
Step 2 -Modify Whites
The Whites Slider impacts the brightest areas of the picture together with pure white. It doesn’t have a mechanism of rebuilding coloration info.
The Whites Slider is most frequently used for setting the white level within the photos for a wider tonal vary.
See additionally: Learn how to Batch Edit in Lightroom
I drag the Whites Slider to the left till it reaches a worth of -100 and assesses if it mounted the overexposed picture.

If it doesn’t, I transfer to the following software.
Step 3 – Steadiness Publicity
The Publicity Slider impacts the general brightness of the picture and tries to imitate the impact produced by the digicam’s publicity settings (aperture, shutter pace, ISO).
For instance, you’re taking two pictures of the identical scene the place one is correctly uncovered and the opposite is underexposed by one cease. You import them into Lightroom and increase the Publicity by one cease within the underexposed picture. This can produce an similar picture to the correctly uncovered picture; each photos can be indistinguishable.
I seize the Publicity Slider and begin by slowly transferring it to the left, making the picture darker.
If at this level you’ll be able to see that the picture is getting darker, however the brightest areas of the photographs are nonetheless blown, this tells you that restoration will not be potential.
See additionally: Learn how to use mushy proofing in Lightroom
Primarily based on my expertise, for those who overexpose a picture by one cease, the Highlights Slider will have the ability to recuperate the brightest areas of the picture. You possibly can steadiness the general brightness of the picture later by utilizing the Publicity Slider.
In case you overexposed your picture by greater than 1.5 to 2 stops, you will have to make use of all three instruments. The consequence will not be at all times predictable as you’ll merely must attempt to decide if restoration is feasible.
Remaining Ideas
One of the simplest ways to keep away from overexposed pictures is to discover ways to use the Histogram in your digicam to at all times get the fitting publicity whereas taking pictures.
To maximise your probabilities of recovering the overexposed picture throughout post-processing, at all times shoot in RAW format. By taking pictures in JPEG, you decrease the prospect of publicity correction after the actual fact.
Articles Associated to “Learn how to Repair an Overexposed Picture in Lightroom“
[ad_2]