

[ad_1]
The preset performance in Lightroom is essentially the most elementary characteristic of this system round which photographers design their digital workflows. In complete, Lightroom makes use of 9 several types of presets that tackle totally different areas of digital asset administration (DAM). The presets can be utilized in several modules of this system such because the
In considered one of my earlier tutorials, I dug deep and specified how every of the 9 kinds of Lightroom presets suits into the large image of digital asset administration and picture modifying.
In at this time’s tutorial, I’ll tackle methods to create and use the Import Presets to simplify and velocity up the method of importing new pictures into Lightroom.
Import Module
My private opinion is that the Import Module is essentially the most complicated and even perhaps essentially the most pointless a part of Lightroom.
Let me clarify.
While you open Lightroom, you can’t merely navigate to a folder in your laptop, choose a picture, and begin modifying it as you’d in just about each different RAW editor. Earlier than you can begin modifying pictures, you need to first import them into the Lightroom Catalog. When you choose the Import Pictures choice, you’re introduced with a complicated interface that encompasses a gazillion totally different choices (or so it appears).
This at all times causes confusion for photographers who’re simply beginning to be taught this system. It’s also the primary stumbling block for Lightroom adoption.
That is the place the Import Presets can play an essential function in overcoming the confusion of the Import Module. You make investments the time to know what import choices are important in your specific workflow after which save them as preset(s). From that second, you need to use the import course of on autopilot.
Let me present you what import settings I take advantage of in my images, why I take advantage of them, and methods to save them as an Import Preset.
Creating Lightroom Import Presets
First, activate the Lightroom Import Module by going to the highest primary menu and choosing
File > Import Pictures and Video…
Optionally, you need to use the keyboard shortcut Ctrl (Possibility on Mac) + Shift + I.
As soon as the Import Module is energetic, you can see the Supply Panel on the left facet. That is the place you choose the situation of the pictures that you just intend to import into Lightroom. You can’t save the supply location as a preset as a result of the situation can fluctuate from import to import relying on whether or not you import pictures from a reminiscence card, an exterior arduous drive, or a neighborhood folder.
File Format and Import Choices
The primary choice it’s important to specify is the way you need Lightroom to deal with pictures through the import course of.

Do you need to convey the photographs within the unique proprietary RAW format, or do you need to convert them to an open supply digital unfavourable format (DNG)?
In my case, I don’t trouble with the conversion and maintain all my RAW pictures within the unique format. I don’t see too many benefits for the additional step.
See additionally: The best way to Set up Lightroom Presets
Subsequent, you need to specify if you wish to Copy, Transfer, or Add the photographs to Lightroom.
The Copy choice signifies that all the chosen pictures shall be copied to the specified vacation spot in your laptop with the originals intact on a reminiscence card.
The Transfer choice signifies that the unique pictures shall be deleted from the reminiscence card throughout import.
I by no means use the Transfer choice to make sure that I’ve a backup of the unique information within the occasion of file corruption through the switch.
The Add choice is used when you have already got pictures in your laptop in the precise location and also you merely need to add them to the catalog.
For instance, in the event you manually copied information from a reminiscence card to a pc, you’d merely use the Add choice.
Subsequent, we transfer to the precise panel the place a lot of the import choices are positioned.
File Dealing with
These are the choices I take advantage of within the File Dealing with panel in 99% of circumstances.

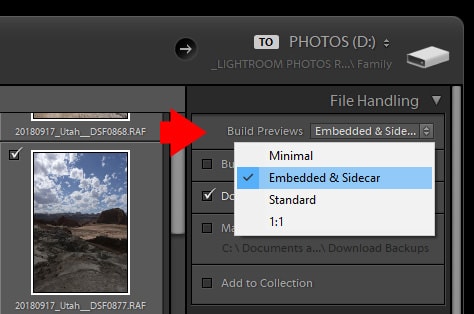
For quicker efficiency, I need to make it possible for full measurement (1:1) previews are generated. I additionally choose the “Construct Good Previews” choice. If you’re undecided what Good Previews are, check out my in-depth article right here: Lightroom Good Previews – When, Why and The best way to Use Them
I choose the “Don’t Import Suspected Duplicates” choice to make sure that I don’t import the identical picture a number of instances.
You’ve got the choice of Making a Second Copy of the imported pictures on one other location like an exterior backup arduous drive. I don’t use this feature as a result of I’ve an automatic backup system that backs up my desktop laptop each night time.
The “Add to Assortment” checkbox makes the imported pictures a part of the gathering of your alternative. I don’t use this perform.
To generate full-size previews and Good Previews for each imported picture takes lots of processing energy and is time-consuming. Once I import 5,000 RAW pictures after considered one of my journeys, this might take hours. I developed a routine to at all times begin the import course of earlier than I’m going to mattress at night time. Once I get up within the morning, the import course of is full, and I’m prepared to begin processing my new pictures.
If I’m on the street with my laptop computer and can’t afford to empty the laptop computer battery to generate full-size previews, I take advantage of the minimalistic choice—Embedded & Sidecar. On this case, Lightroom makes use of smaller previews which are generated by the digicam and embedded into the RAW information. This enables me to begin analyzing and culling my pictures in seconds with out taxing my laptop computer battery.
File Renaming
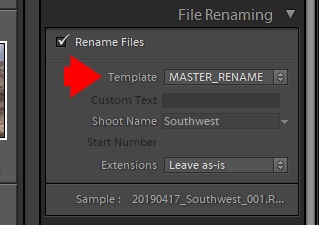
Lightroom offers you the choice to rename all of the information that you just import into the catalog. That is an optionally available characteristic. It’s completely regular to maintain the unique file names generated by the digicam.
I favor to rename my pictures by including the date the picture was taken and the situation to the unique file title. To verify my naming conference is constant, I take advantage of the File Renaming Presets.
To learn to create and use File Renaming Presets, try my devoted article right here: The best way to Create and Use Lightroom File Renaming Presets
Apply Throughout Import
Right here you may apply the Develop Preset of your option to all of the imported pictures. For a very long time, I hardly used this performance. I solely lately began to understand it due to the advances in machine studying.
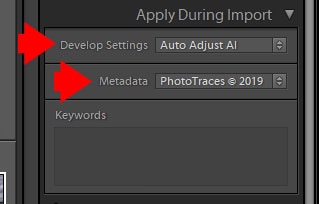
Within the Primary Panel of the Develop Module, there’s an Auto Button that’s powered by AI and machine studying algorithms. When the Auto perform is activated, Lightroom analyzes the picture and tries to enhance it routinely by making use of varied edits. This characteristic turns into more practical and helpful with each Lightroom replace. I created a Develop Preset (Auto Modify AI) that solely does one factor—triggers the Auto perform. Once I apply this preset to all my imported pictures, it offers me a extra real looking model to begin organizing and culling my newly imported pictures within the Library Module.
Subsequent, there’s a very helpful choice to use a Copyright Preset to all of your pictures through the import course of. I take advantage of this feature with any picture I convey into Lightroom.
You may learn to create your personal Copyright Presets right here: The best way to Create and Use Lightroom Copyright Presets
You may go away the Key phrases part empty. Key phrase choice varies for each import so you’ll enter these manually.
Vacation spot
You specify the place you need the brand new pictures to be saved within the Vacation spot Panel.
That is the setup I take advantage of for the Vacation spot Panel.
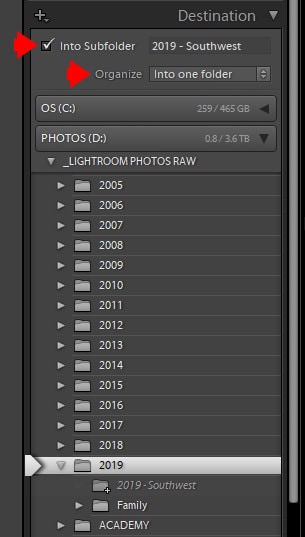
I specify the title of the folder I need to create and retailer all of the imported pictures there. Optionally, you may arrange the pictures By Date. For every date, Lightroom will create a devoted folder utilizing the date because the folder title.
Saving the Import Setting as a Presets
When you’re pleased with the Import settings, click on the black panel on the backside of the Import Module and the “Save the Present Settings as a New Preset…” choice shall be out there.
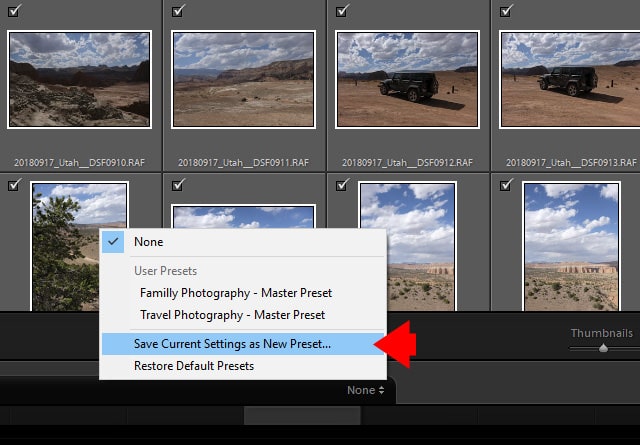
Title the brand new preset and click on the Save button.
You’re achieved.
Making use of the Import Presets
The following time you import new pictures into Lightroom you’ll not must undergo all of the choices of the Import Module. You may even decrease all the Import interface by clicking the Decrease button on the underside left nook.
From the underside of the panel, choose the Import Preset you created within the earlier step. Subsequent, specify the key phrases you need to add to all the import. Then, you’re able to hit the Import button.

Closing Ideas
Associated Articles and Tutorials:
[ad_2]