

[ad_1]
If you’re on the lookout for prime Lightroom workflow tricks to optimize and velocity up your modifying course of, you have to learn this text.
What’s Lightroom Workflow?
Lightroom workflow is a sequence of steps you have to full, from the second you seize the RAW picture along with your digicam to publishing the ultimate picture. The workflow steps embody importing photographs, culling, keywording, processing, modifying, and at last, exporting and publishing.
Lightroom Workflow Ideas
Lightroom has been round for nearly 20 years and is now a mature and complex program. You might simply write an 800-page guide devoted completely to Lightroom ideas and tips.
I chosen 15 of my favourite Lightroom workflow ideas for at this time’s article. The following tips are probably the most impactful to my pictures and my enterprise, and they’re ones that I exploit each day.
1. Rushing up Lightroom Efficiency
Lightroom is the one, most essential utility for a lot of photographers, together with myself. It’s the heart of not solely our modifying workflows however our pictures companies as properly.
We use Lightroom for organizing, modifying, publishing, and printing pictures. Plus, it may be related to numerous providers with the assistance of plugins.
Our largest annoyance with Lightroom is its gradual efficiency and lagging responsiveness.
I’m all the time essential of Adobe, an organization with the best sources within the business, for failing to deal with the efficiency difficulty after years of empty guarantees.
Since we can not depend on Adobe, we’re compelled to search for options by testing totally different configurations and sharing our findings.
A few years in the past, I revealed a devoted article on the subject. Though a lot of the ideas from the article are nonetheless related, all of the enhancements are marginal. They could provide help to improve Lightroom’s efficiency by 1% to 2% at most, however that is solely a drop within the bucket.
As we speak, I’ll share my prime tip for bettering Lightroom efficiency by an element of a minimum of two.
For me, probably the most dramatic change in Lightroom consumer expertise occurred after I modified my desktop pc’s predominant onerous drive from an previous, mechanical spinning drive to a brand new technology Stable State Drive (SSD). The SSD makes use of know-how just like what you will discover in any flash thumb drive and, because of this, is far quicker and extra dependable.
See additionally: The right way to Change Lightroom Catalog Location
The primary problem with an SSD is that the know-how remains to be comparatively new and SSDs are costlier than the previous spinning variations. Which means that I can not afford to purchase the 8TB SSD model to retailer my whole picture library.
When Lightroom is put in on a quick SSD drive however nonetheless has entry to the RAW pictures on a spinning onerous drive, the effectiveness of the SSD setup diminishes.
Right here is my answer.
After I return from a visit with 1000’s of latest pictures, I create a short lived listing on my 1TB SSD drive and import all the brand new pictures there. Which means that I can totally benefit from the SSD expertise and its blistering velocity. I maintain the brand new pictures within the temp listing till I’m completed processing and modifying them. This may take weeks and even months. As soon as I’m completed, I transfer them into the primary library on the 8TB spinning drive.

I like to recommend the EVO Samsung SSD fashions as a result of they’ve one of the best migration software program. This permits seamless migration from the previous drive with out reinstalling the working system. Additionally, it doesn’t require technical data. I’ve completed this efficiently twice.
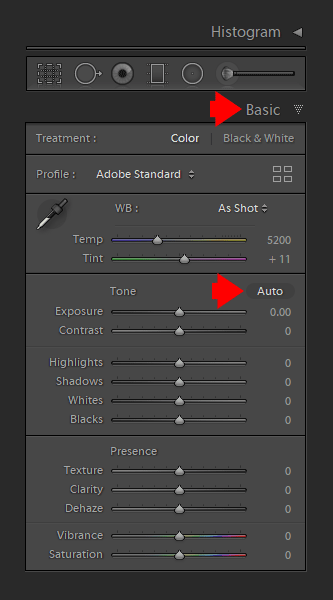
2. Use AUTO Tone Mode
AUTO Tone might be probably the most obscure and least used characteristic in Lightroom. Yow will discover it within the Develop Mode beneath the Primary Panel. By urgent the AUTO button, you let Lightroom determine what edits to use to the chosen picture.
AUTO Tone was out there in Lightroom for a very long time and was just about a ineffective characteristic that produced unpredictable outcomes. However, with the advances in Synthetic Intelligence and Machine Studying, AUTO Tone is getting higher and higher at evaluating photographs and making use of the suitable edits.
Don’t disregard AUTO Tone. Strive it with each picture as a result of, generally, it gives you an incredible place to begin to your modifying course of.
If you wish to take this even additional, create a Develop Preset with solely the AUTO Tone edit recorded. Apply it to all of your pictures through the import course of to present each new picture a novel modifying baseline.
Assets:
3. Use Selective Saturation
After we shoot JPEG, the digicam takes the info collected from the sensor and runs it via the digicam processor. The processor converts the uncooked knowledge to the picture, applies totally different edits, together with saturation and distinction, primarily based on predefined algorithms, and saves the picture as a JPEG file. After we shoot RAW, it’s as much as the photographer to determine what edits to use to any particular picture.
One of the crucial essential selections we’ve got to make is the best way to correctly deal with picture saturation.
You in all probability observed that saturation might make or break your picture. When utilized correctly, it could possibly convey any picture to life. However, on the similar time, it’s also very straightforward to destroy a photograph with oversaturation.
Each Lightroom consumer is aware of the 2 predominant instruments to manage saturation in pictures—Saturation and Vibrance, that are situated beneath the Primary Panel.
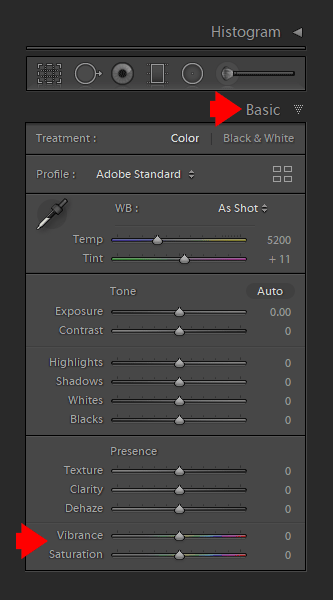
The Saturation slider equally will increase the colour depth to all the colours. The Vibrance device applies saturation disproportionally, prioritizing colours with decrease depth.
Whenever you use the Saturation, the Vibrance, or a mixture of each, you find yourself with a photograph the place all the colours have boosted saturation. It’s troublesome to emphasise one particular coloration or group of colours for a greater visible affect.
To have higher management over coloration saturation, I exploit a special strategy. I exploit the HSL (Hue, Saturation, Luminance) panel. This panel permits me to selectively management the saturation for each picture coloration.
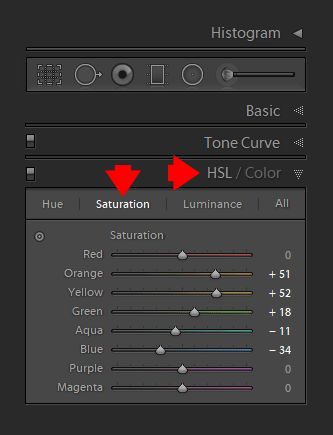
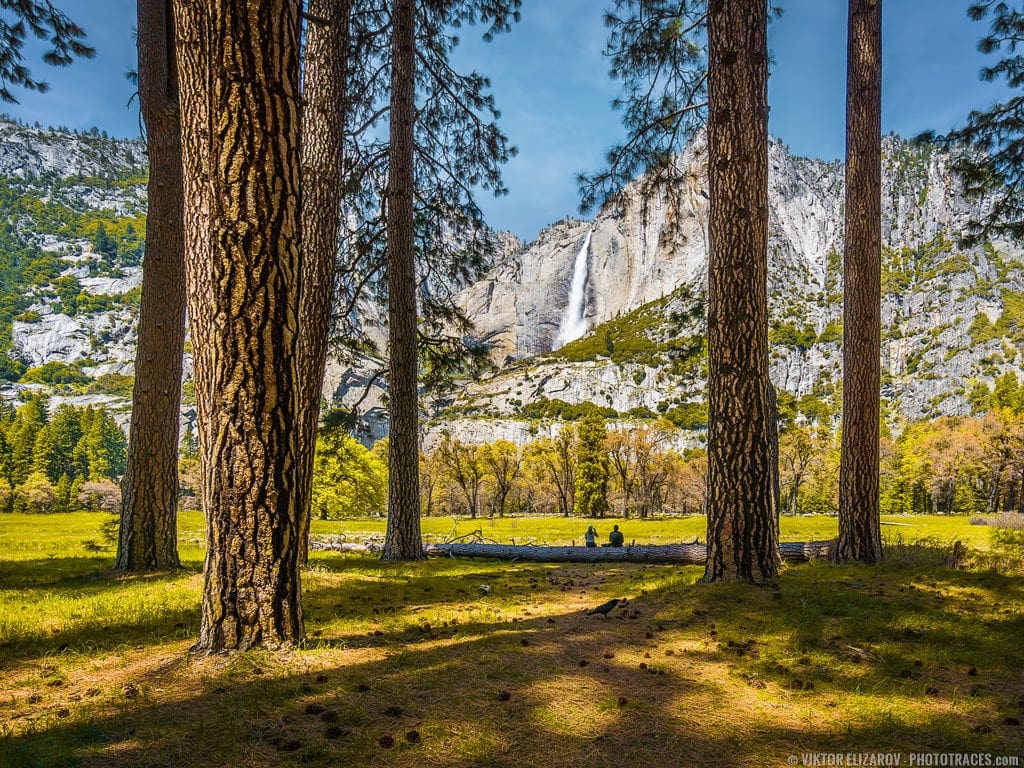
For instance, if I wish to emphasize the vegetation in my panorama picture, I enhance the saturation of solely the yellows and greens. I’d even scale back the saturation of the sky (blue coloration) to make it simpler to attract the viewer’s consideration.
4. Maximize the Tonal Vary in Your Images
Maximizing the tonal vary means utilizing the complete vary of tones from pure black to pure white.
For instance, while you take a photograph on an overcast and gloomy day, the picture could have a restricted tonal vary of largely greys with out very darkish or shiny tones.
We will maximize the tonal vary of any given picture by setting the black and white factors.
Lightroom has built-in performance for setting black and white factors. This can be a semi-automated course of.
Open the Primary Panel of the Develop Module.
Maintain down the SHIFT key and double-click the Whites label on the left facet of the modifying slider. Lightroom will robotically set the White Level by setting the Whites worth to a most worth that doesn’t introduce pure white.
Subsequent, maintain down the SHIFT key and double-click the Black label. Lightroom will robotically set the Black Level by setting the Black worth to a minimal with out clipping it (introducing pure black).

The result’s a picture with a full tonal vary.
If you wish to discover ways to use this easy method when modifying panorama pictures, take a look at the next tutorial: The right way to Set Black and White Factors in Lightroom
5. Use the Sensible Distinction Approach
Distinction is one other essential method that we apply to almost each picture we edit. Correctly utilized Distinction makes the picture pop and creates a better visible affect.
In Lightroom, there’s a devoted Distinction Slider within the Primary Panel. The best way the Distinction performance works is that it makes darker colours darker and brighter colours brighter by creating a better tonal distinction between the darkish and shiny areas of the picture.
However since we can not individually management at what diploma this system impacts the darkish and shiny tones, it’s usually unattainable to maximise the distinction with out clipping the whites or blacks.
I exploit a special method to have higher management over the Distinction. I exploit the Area sliders within the Tone Curve Panel.
Right here is my typical slide configuration for panorama pictures.
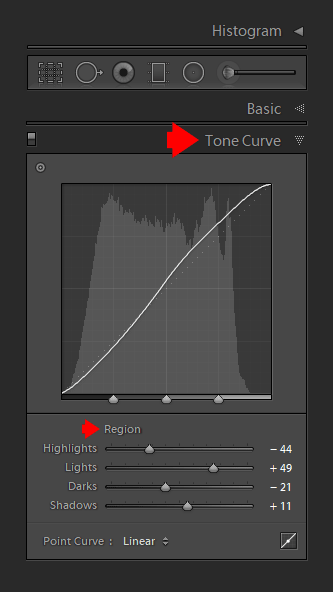
First, I wish to guarantee I defend the brighter areas of the picture from unintentional clipping. I set the Spotlight worth to -44.
I additionally wish to defend the darkish tones. I set the Shadows worth to +11.
Subsequent, I begin experimenting by rising the Lights’ worth and lowering the Darks’ worth.
After all, each picture is totally different and requires a special Area slider configuration. Usually, I enhance the Lights to a a lot increased diploma than how a lot I scale back the Darks.
The flexibility to regulate the brilliant and darkish areas of the picture individually offers us significantly better management over the distinction adjustment course of.
6. Use Batch Modifying
Batch Modifying is the method of modifying a number of pictures concurrently. It could doubtlessly save an infinite period of time when used correctly.
The commonest Batch Modifying method is when you choose a number of pictures in Lightroom and apply the Develop Presets to all of them. Though this can be a very fashionable strategy to Batch Modifying, I hardly use it. I discover that even after making use of a preset to 20-30 pictures, I nonetheless spend hours tweaking every picture individually.
I exploit a special technique as an alternative.
I most frequently use Batch Modifying with pictures taken on the similar location. For instance, when I’ve 50 new pictures after capturing a sundown, I do know that every one the pictures have been taken in related lighting circumstances utilizing a comparable taking pictures method. This implies the pictures would require an analogous modifying strategy.
I choose a single picture that greatest represents the taking pictures scene. I exploit the Fast Modifying workflow by making use of the fashion Develop Preset first, after which I exploit the Toolkit Preset Assortment to finetune the picture. If essential, I’d manually tweak a few the modifying sliders, probably from the HSL Panel, to regulate the person colours individually.
When I’m pleased with the ultimate end result, I choose the remainder of the pictures from the shoot and apply the identical edits to all of them. I exploit one of many strategies I outlined on this article: The right way to Batch Edit in Lightroom.

Utilizing this Batch Modifying technique produces one of the best outcomes. I hardly have to do any modifying to the person pictures.
7. Use Selective Sharpening in Lightroom
Usually, I don’t use Noise Discount and Sharpening in Lightroom. I want Photoshop as an alternative as a result of I discover that it offers me extra management.
Let me clarify.
After I sharpen my panorama pictures, I all the time apply sharpening selectively. I by no means wish to sharpen the realm of the sky or the water; I’ll even soften these areas utilizing noise discount.
Associated: My Favourite Approach to Add Vignetting in Photoshop
In Photoshop, I apply sharpening to the complete picture first after which use the transparency masks to have an effect on solely the chosen areas.
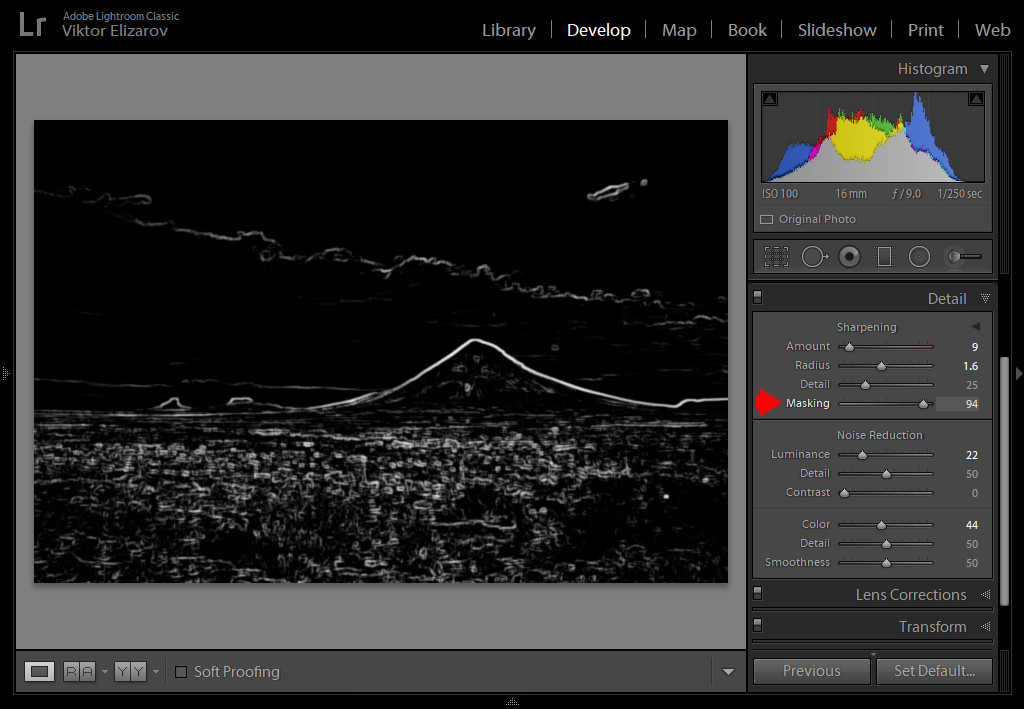
Though Selective Modifying in Lightroom is proscribed, we nonetheless have some management over-sharpening. After making use of sharpening to the complete picture, you’ll be able to open the Particulars Panel and use the Masking slider to slender the affected space.
Right here is the primary trick—maintain the Alt/Choose key down when dragging the Masking slider to raised visualize the affected space. The realm affected by the sharpening will present in white, and the unaffected space will present in black. Through the use of excessive Masking values (90-100), you’ll be able to restrict the sharpening impact to solely the sides of the picture.
I exploit this Selective Sharpening method after I don’t have time for Photoshop modifying.
8. Use Import Presets
The preset performance is a basis of Lightroom. This system makes use of 9 various kinds of presets (develop presets, metadata presets, filter presets, export presets, and many others.) in numerous areas to assist photographers velocity up and automate the complete modifying course of.
I contemplate the Import Presets to be probably the most helpful and, on the similar time, probably the most underutilized device by many photographers.
Associated: Publicity X Evaluation – Quickest RAW Editor As we speak
Indisputably, Lightroom’s Import Module is probably the most complicated and least intuitive space of this system. It causes probably the most headache and confusion for brand spanking new Lightroom customers.
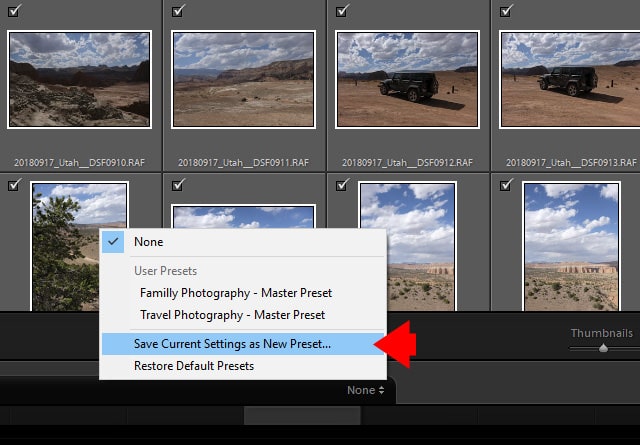
One of the best ways to beat the complexity of the Import Module is to create Import Presets and use them with each import.
Assets:
9. Use the Histogram as an Modifying Instrument
In pictures, the Histogram is the graphical illustration of pixels distributed in any given picture primarily based on its brightness.
The Histogram is a photographer’s greatest buddy. When utilized in a digicam, histograms assist us produce well-exposed pictures. When utilized in Lightroom or every other picture modifying program, histograms assist us fine-tune or appropriate the publicity.
In Lightroom, the Histogram is greater than an informational operate. Additionally it is an modifying device.
Within the Develop Module, in the event you transfer the mouse over the Histogram, you’ll be able to choose 5 totally different areas. By dragging the mouse to the correct and left, you’ll be able to visually regulate the next parameters—Blacks, Shadows, Publicity, Highlights, and Whites.
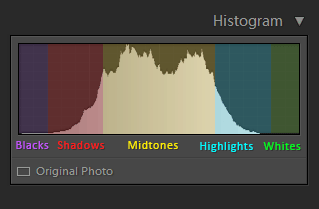
It’s principally gamification of the modifying course of. It’s enjoyable to see how reshaping the Histogram impacts the corresponding picture.
Assets:
10. Study Solely the Important Shortcuts
I don’t have to persuade anybody that keyboard shortcuts can drastically velocity up using any pc program. All of us perceive that. However studying keyboard shortcuts in Lightroom is tougher than in every other program, together with Photoshop. First, there are over 100 shortcuts in Lightroom. Second, the identical shortcut can have totally different features in numerous program modules.
My strategy to Lightroom shortcuts is to study solely the most important and helpful shortcuts to your workflow and disrespect the remaining.
For instance, my all-time favourite shortcut is “” (backslash), which reverts the chosen picture to the unique state with out altering the crop changes. It’s one of the simplest ways to examine the outcomes of your modifying. The shortcut is known as Earlier than & After.
There’s one other helpful trick for memorizing probably the most helpful keyboard shortcuts in Lightroom. You need to use the Panel Finish Mark operate to show the cheat sheet with all of your favourite shortcuts contained in the facet panels.
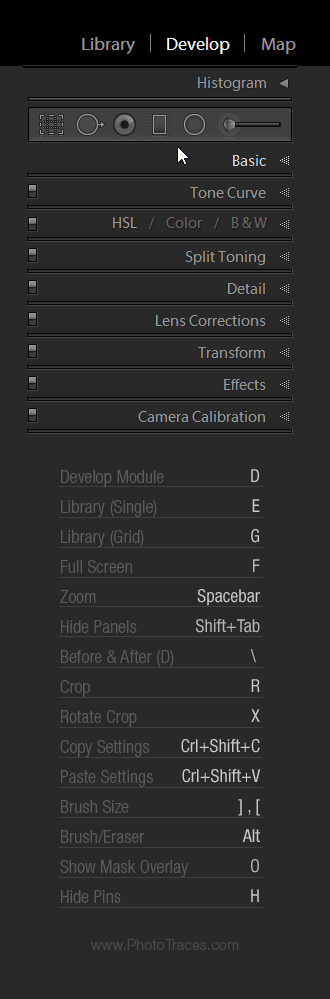
Try the tutorial beneath to discover ways to obtain probably the most helpful shortcuts cheat sheet and show it in Lightroom.
Assets:
11. Use the Energy of Alt/Choose Key
Keyboard shortcuts in Lightroom set off sure features in this system. They merely save time. However there may be one other set of keyboard keys that operate fairly a bit in a different way. They modify or lengthen the features of the present modifying instruments. I name these “keyboard modifiers.”

Crucial keyboard modifier in Lightroom is the Alt/Choose key. The widespread function of the Alt/Choose modifier is as a reset operate. For instance, by holding down the Alt/Choose key within the Primary Panel, new reset choices (Reset Tone and Reset Presence) seem. You may reset a number of modifying sliders again to their default values by clicking the brand new reset possibility. The Alt/Choose key triggers reset choices in virtually each modifying panel.
One other helpful operate of the Alt/Choose keyboard in Lightroom is visualization. It helps you see the affected space of the modifying operate, resembling sharpening, noise discount, or cut up firming.
For a full checklist of the Alt/Choose features, take a look at this text right here: Lightroom’s Secret Weapon – Alt/Choose Keyboard Modifiers
12. Change Masks Colour of Adjustment Instruments
When Lightroom was initially launched, it had no selective modifying instruments. Results might solely be utilized to the complete picture. For selective modifying, you had to make use of Photoshop.
Over time, Adobe added a variety of selective adjustment instruments to dramatically change the usefulness and flexibility of this system.
The Adjustment Brush, the Graduated Filter, and the Radial Filters are instruments that made Lightroom an modifying powerhouse appropriate for any kind of pictures.
To raised visualize the impact of the adjustment device, you merely use the shortcut “O” (it stands for “overlay”) and Lightroom exhibits the affected space of the picture in purple (the default coloration).

In case your picture has predominantly purple colours, it’s troublesome to visualise purple towards the default purple. Use the shortcut “Shift+O” to alter the colour of the overlay. Your choices are inexperienced, purple, blue, and gray.
13. Use Solo Mode in Develop Module
Lightroom has 9 complete modifying panels within the Develop Module. When you’ve got all of the panels open, discovering the modifying slider you want could be extraordinarily troublesome. Plus, the complete modifying course of turns into an train in continuously scrolling via the prolonged panels.
Fortunately, there may be another choice. Solo Mode lets you have just one modifying panel open at a time.
To entry Solo Mode, right-click the header of any modifying panel and choose the Solo Mode possibility.
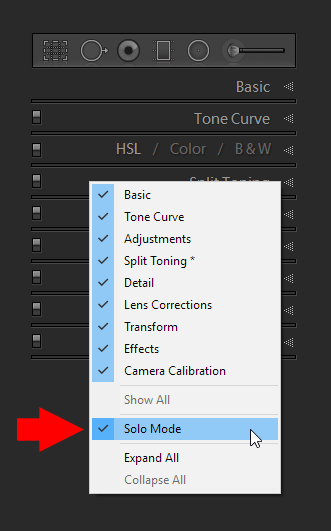
In my case, Solo Mode is all the time energetic and retains my UI neat.
14. Use Information Overlays When Cropping Images
If I needed to estimate, I’d say that I exploit the Crop Overlay device with 99% of the photographs I edit. After all, I all the time attempt to get the correct composition within the digicam, however even after I succeed, every picture requires some tweaking.
Generally, I have to straighten the horizon or crop out a distractive rock. Different instances I wish to enhance the composition by making it tighter.
That is when the Information Overlay comes into play. The device is a visible helper that makes our job of bettering composition a lot simpler.
When the Crop Overlay device is energetic, use the “O” shortcut (“overlay”) to cycle via the seven choices—Grid, Thirds, Diagonals, Triangle, Golden Ratio, Golden Spiral, Side Ratios.

In my case, I most frequently use the Golden Ratio and Thirds.
15. Use Cap Lock Autoadvance Mode
After I have to undergo 1000’s of pictures to charge them as “rejects” and “keepers,” the Autoadvance Mode in Lightroom’s Library Module is available in very helpful.
Hit the Caps Lock button to activate it.
With the Autoadvance Mode activated, hitting the “P” (“decide”) shortcut flags the picture and robotically advances to the following picture. This looks like solely a small assist, however it saves an incredible period of time when culling a lot of photographs.
Assets:
Lightroom Workflow Ideas: Conclusion
I listed 15 of my favourite Lightroom ideas which have the strongest affect on my pictures. You don’t have to memorize or study all of them. Merely choose those that may considerably enhance your picture modifying workflow and incorporate them into your modifying course of.
Articles Associated to “15 High Lightroom Workflow Ideas for a Higher Modifying Expertise“
[ad_2]